Info Panel with ESP32 2.8" Display
✅ CompletedBuild a control panel using ESP32 2.8 inch Display to control heating, lights, switches and display time and temperature
Required Devices
Used Components (22)
Native API
api Communication protocol for connecting ESPHome to Home Assistant and other clients
Captive Portal
captive_portal Fallback WiFi configuration portal when device cannot connect
MIPI SPI Display
mipi_spi Display driver for MIPI-compliant SPI displays like ST7789V
Display Color
color Color definitions and helpers for display components
Font
font Load and use TrueType fonts for display text rendering
Monochromatic Light
monochromatic Single-channel dimmable light control
RGB Light
rgb Three-channel color light control
Image
image Display bitmap images on screens and displays
I2C Bus
i2c Inter-Integrated Circuit communication bus for connecting multiple devices
LVGL
lvgl Light and Versatile Graphics Library for advanced touchscreen UIs
Template Number
template Create custom number entities with computed or user-adjustable values
Over-The-Air Updates (OTA)
ota Update ESPHome firmware wirelessly over the network
LEDC Output
ledc PWM output using ESP32's LED Control peripheral
Home Assistant Sensor
homeassistant Import sensor values from Home Assistant entities
Script
script Create reusable automation sequences
Home Assistant Switch
homeassistant Control Home Assistant switch entities from ESPHome
SPI Bus
spi Serial Peripheral Interface communication bus for high-speed device connections
Home Assistant Time
homeassistant Synchronize time from Home Assistant
Home Assistant Text Sensor
homeassistant Import text and string values from Home Assistant entities
CST816 Touchscreen
cst816 Capacitive touchscreen driver for CST816 controller
WiFi
wifi Configure WiFi connectivity for ESP devices
Template Switch
template Create custom virtual switches with programmable behavior
Project Overview
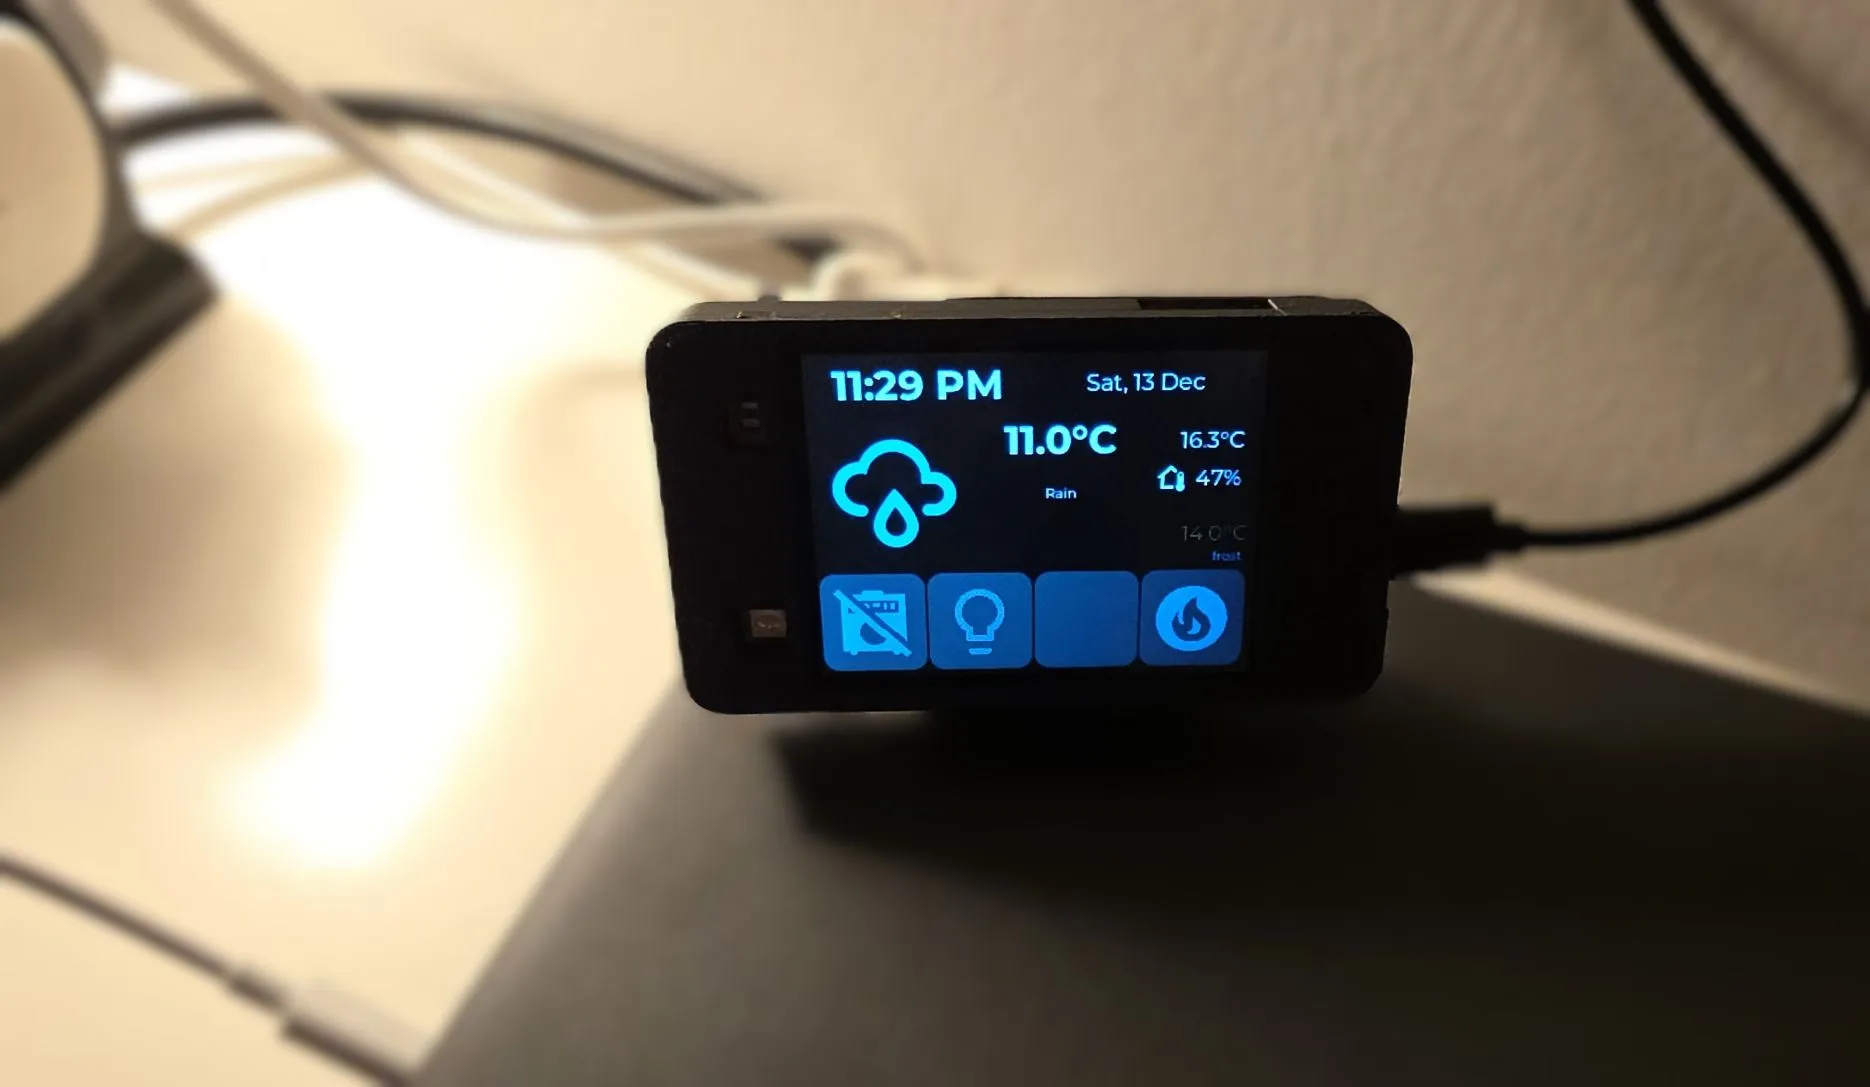
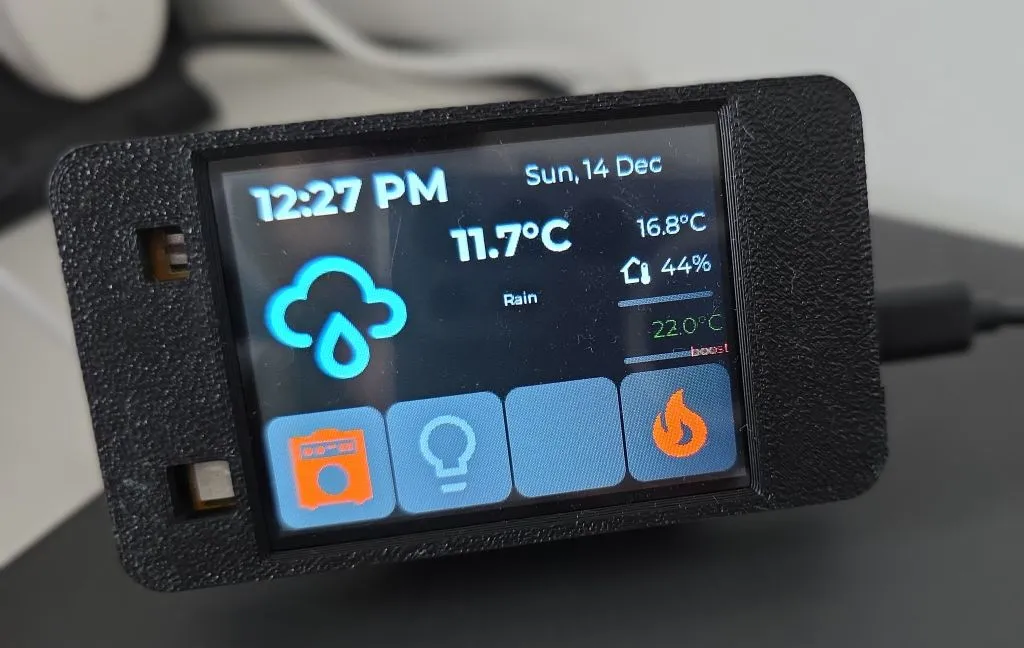
Smart home control panel with a touchscreen interface that provides:
- 🕐 Real-time clock display with date
- 🌤️ Weather information (current conditions, temperature, forecast)
- 🌡️ Indoor climate monitoring (temperature and humidity)
- 🔥 Thermostat control with preset modes (frost, eco, boost)
- 💡 Light and appliance switch controls
- 🎨 Custom LVGL-based UI with touch interaction
- 💤 Auto-sleep with touch-to-wake functionality
- 🛡️ Anti-burn-in protection for display longevity
- 🌈 RGB LED for status
I did this project for my boy. We have a shed where he can play his guitar. For most of the time the heater is off. It just turns on so it keeps a reasonable temperature for the gear during cold months. The panel gives him information on outside temperature, weather forecast and inside temperature.
He can remotely turn on heating if he wants the temperature to be more pleasant for playing, and he can remotely turn on lights, amp and the rest of the gear (hence the amp switch in the project). Actually, the main feature is that he can turn all of them off because he forgets to do it occasionally 😁.
It is fully functional, lots of features, only one device used and it has a 3D printed enclosure for it.
While it has lots of coding, I consider it intermediate because you don’t need to figure out anything
hardware related. There’s no wiring, only plug it in and copy code and with a bit of tweaking you should
have it going in no time.
Progress
- ✅ Main Configuration - fully functional
- ✅ 3D Enclosure
- RGB LED Indicator
- Alarm
Future improvement ideas
- RGB LED that is “breathing” red while the heating is on, maybe green when the amp is on, just to remind him to switch them off 😉
- Alarm - sound alarm when the windows are open and it is forecasted to rain 🤔
Reusability Note
The project is not as reusable as I would like it, but it offers a lot if you need any of the features described above. You can adapt it to your specific needs by modifying the substitutions and entity IDs. However, customizing the LVGL UI layout or adding/removing features will require a bit of understanding of LVGL and ESPHome.
I hope the config file is readable enough and the additional descriptions here are useful. I’ll keep improving it as I go along.
What You’ll Need
Hardware
- 1x JC2432W328C ESP32 2.8” Display - This project uses nearly all integrated features of the board.
- 1x USB-C cable (data capable)
- 1x Power supply (USB charger, 5V/1A minimum)
- Optional: 3D printer for custom enclosure
Software
- ESPHome installed
- Home Assistant with configured weather integration
- Met.no used, which is used by 82.4% of all users so this should work out of the box
- Home Assistant entities:
- Indoor temperature sensor
- Indoor humidity sensor
- Climate entity (thermostat/heater)
- Switch entities (lights, appliances)
- USB-to-Serial drivers (CH340C chip is used by the board, it was plug-and-play for me on Windows 11)
Additional Files
- Material Design Icons font file - see font component for more comprehensive explanation.
weather_icon_map.hheader file (provided below)
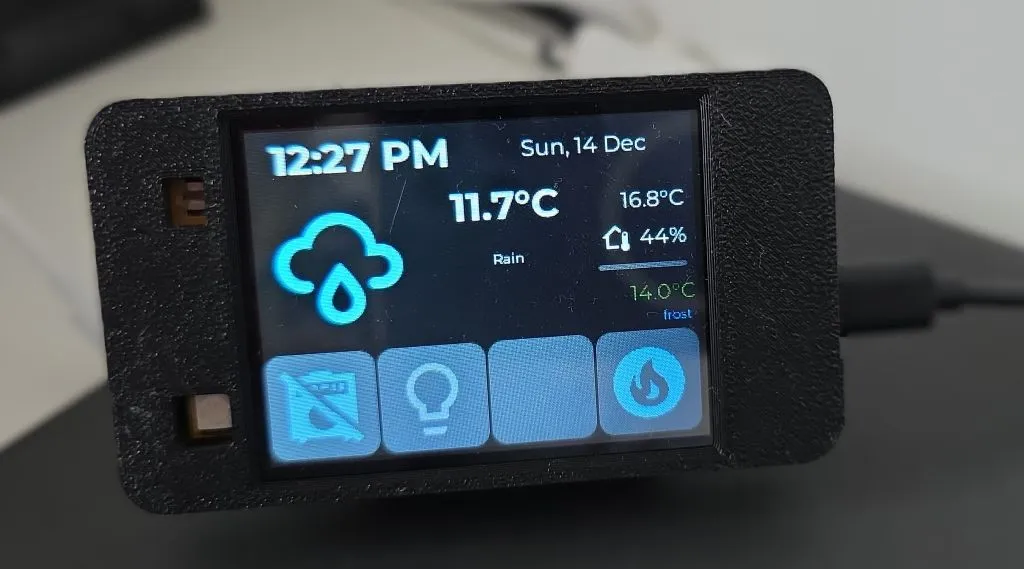
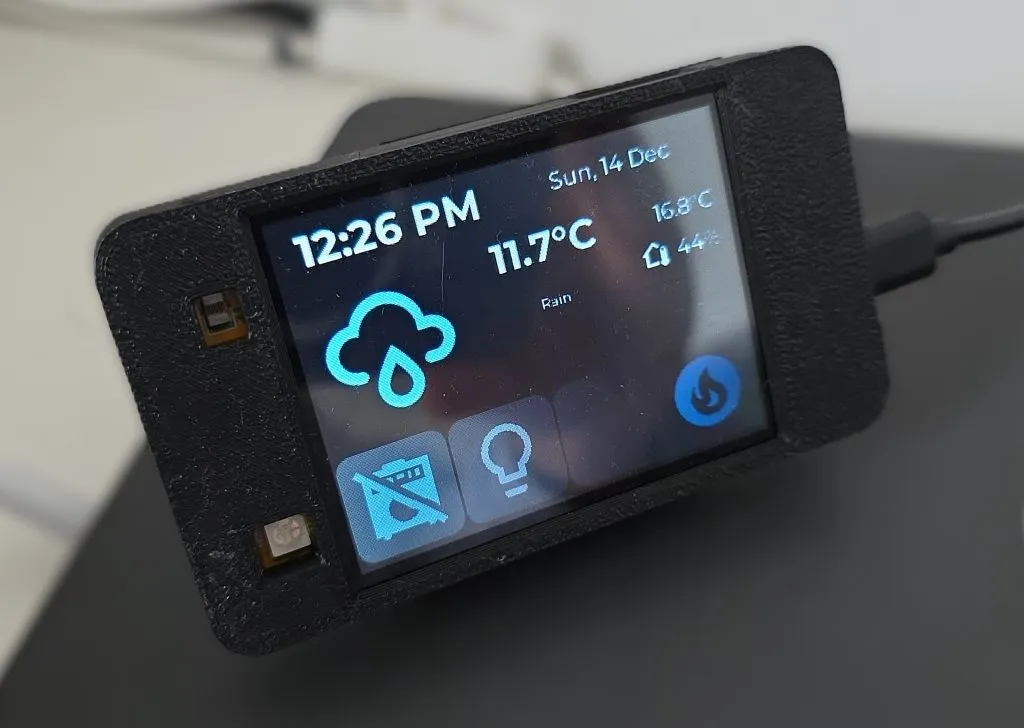
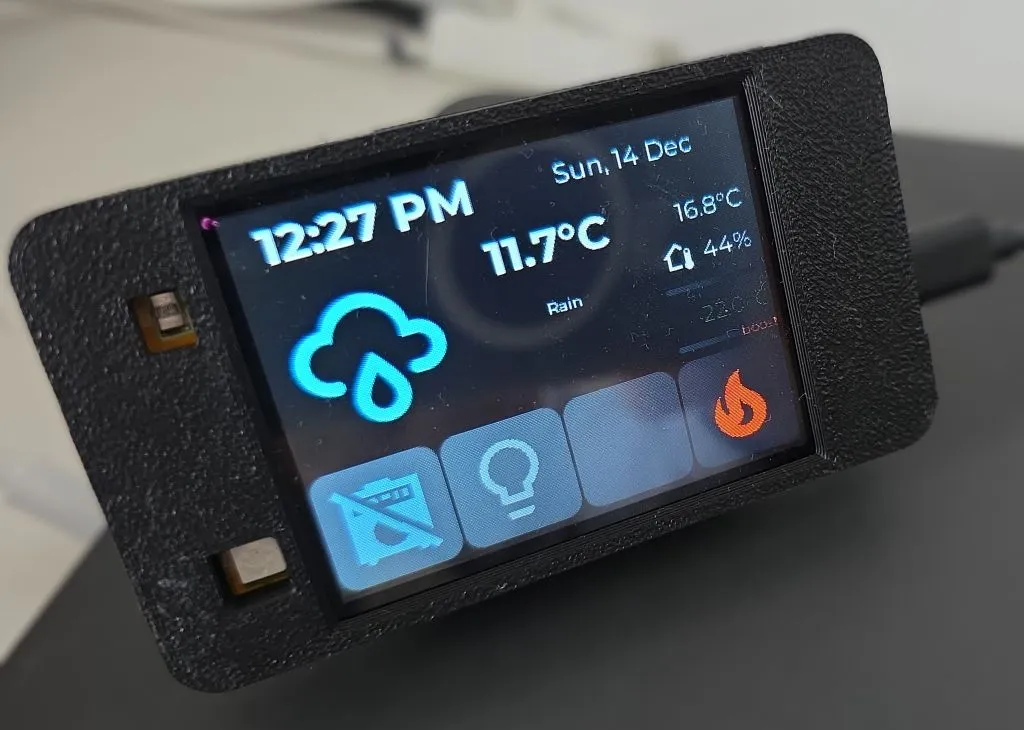
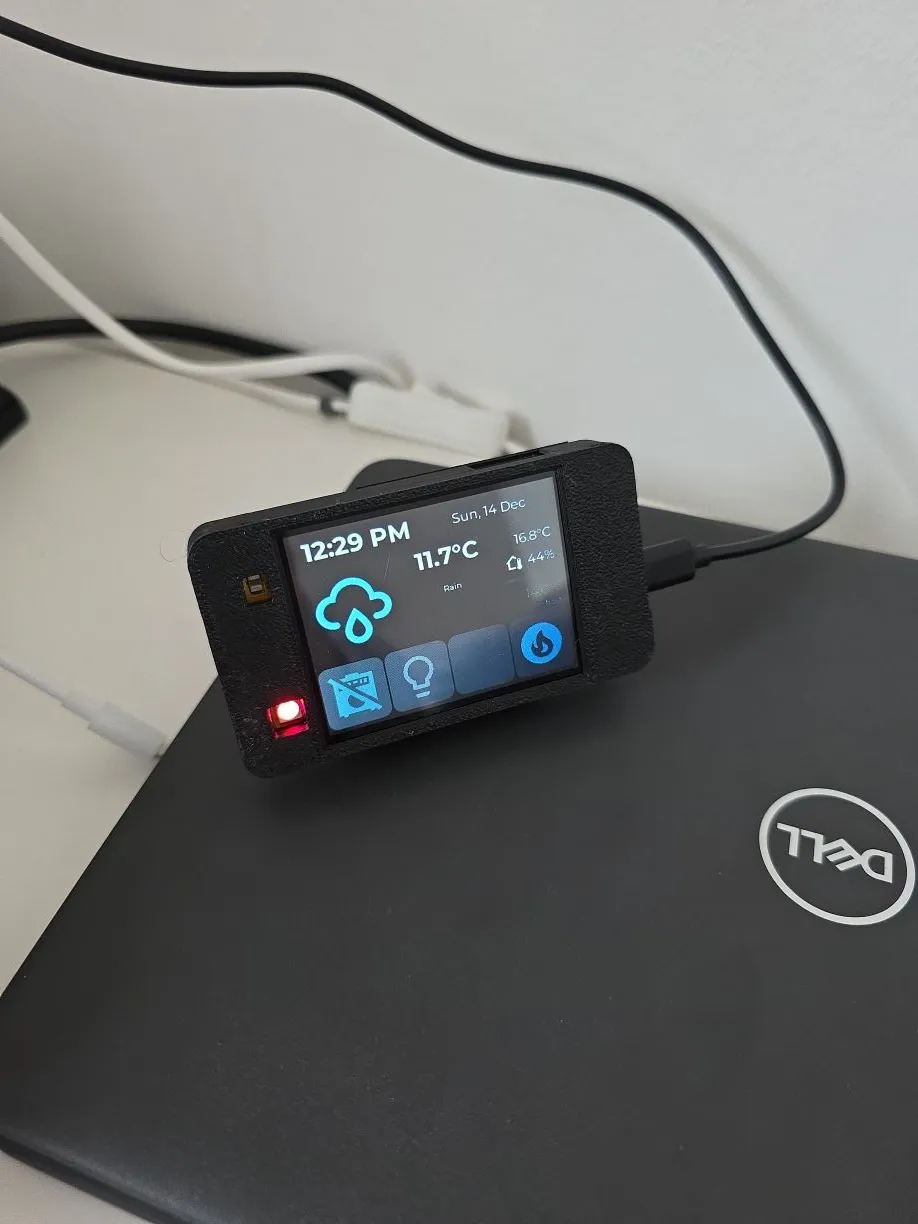
Project Photos
Some photos of the device in action:

Hardware Setup
The JC2432W328C is an integrated ESP32 development board with a 2.8” IPS touchscreen display. For detailed specifications and pinout information, see the JC2432W328C device page.
No additional wiring is required as the display and touchscreen are pre-wired on the board. Simply connect via USB-C for programming and power.
3D Printed Enclosure
I used couple of models to print mine. I could not find exact device so I used:
- Case from this one: CYD ESP32-2432S028 Case
- Just the stand from this one: Enclosure for Sunton ESP32-2432S028R Cheap Yellow Display
I had to add some negative volume in my Prusa Slicer to get the holes in the right place. Once I figure out how to export this as STL I’ll post a link, meanwhile, here’s Prusa Slicer Project.
ESPHome Configuration
Prerequisites
Before using this configuration, ensure you have:
- A working Home Assistant installation with the following configured:
- Weather integration (e.g.,
weather.forecast_home) - Indoor temperature and humidity sensors
- A climate entity for heating control
- Switch and light entities to control
- Weather integration (e.g.,
- Material Design Icons font file saved in your ESPHome directory as
assets/materialdesignicons-webfont.ttf - The
weather_icon_map.hheader file (see below)
Secrets File Setup
Create a secrets.yaml file in your ESPHome directory with your credentials:
wifi_ssid: "Your_WiFi_SSID"
wifi_password: "Your_WiFi_Password"
For more information on using secrets in ESPHome, refer to the ESPHome documentation.
Weather Icon Map Header File
This is just a helper code used in multiple projects. Alternative is using Mapping
Create a file named weather_icon_map.h in your ESPHome directory:
// weather_icon_map.h
#include <map>

// Map Home Assistant weather conditions to Material Design Icons
std::map<std::string, std::string> weather_icon_map
  {
    {"clear-night", "\U000F0594"},
    {"cloudy", "\U000F0590"},
    {"exceptional", "\U000F0F2F"},
    {"fog", "\U000F0591"},
    {"hail", "\U000F0592"},
    {"lightning", "\U000F0593"},
    {"lightning-rainy", "\U000F067E"},
    {"partlycloudy", "\U000F0595"},
    {"pouring", "\U000F0596"},
    {"rainy", "\U000F0597"},
    {"snowy", "\U000F0598"},
    {"snowy-rainy", "\U000F067F"},
    {"sunny", "\U000F0599"},
    {"windy", "\U000F059D"},
    {"windy-variant", "\U000F059E"},
    {"sunny-off", "\U000F14E4"},
  };

// Map Home Assistant weather conditions to description
std::map<std::string, std::string> weather_desc_map
  {
    {"clear-night", "Clear Night"},
    {"cloudy", "Cloudy"},
    {"exceptional", "Exceptional"},
    {"fog", "Fog"},
    {"hail", "Hail"},
    {"lightning", "Lightning"},
    {"lightning-rainy", "Rain and Lightning"},
    {"partlycloudy", "Partly Cloudy"},
    {"pouring", "Heavy Rain"},
    {"rainy", "Rain"},
    {"snowy", "Snow"},
    {"snowy-rainy", "Snow and Rain"},
    {"sunny", "Nice!"},
    {"windy", "Windy"},
    {"windy-variant", "Windy, cloudy"},
    {"sunny-off", ""},
  };
Main Configuration File
If you’re using
ESPHome Device Builder
create your New Device. Or if you’re using
command line create your yaml file
(e.g. panel-info-28.yaml).
Then use the following file as a guide (details on how to customize it are below):
esphome:
name: panel-info-28
friendly_name: panel-info-28
includes:
- weather_icon_map.h
on_boot:
- priority: 1
then:
- delay: 5s
- lvgl.label.update:
id: lbl_boot
text: "connecting ..."
esp32:
board: esp32dev
framework:
type: esp-idf
# Enable logging
logger:
level: WARN
# Enable Home Assistant API
# https://esphome.io/guides/getting_started_hassio/
# to generate key
# https://esphome.io/components/api/
# Generated this key just now, not used anywhere. Build checks that it's an actual key
api:
encryption:
key: "syclMF/ZlhWdWeHMTm1qyWvjrPI2x7kwLnKldec5/Nk="
# https://esphome.io/components/ota/
ota:
- platform: esphome
password: "your strong password"
# https://esphome.io/components/wifi/
wifi:
ssid: !secret wifi_ssid
password: !secret wifi_password
# Enable fallback hotspot (captive portal) in case wifi connection fails
# https://esphome.io/components/wifi/#access-point-mode
ap:
ssid: "Panel-Info-28 Fallback Hotspot"
password: "your temp pass"
# https://esphome.io/components/wifi/#on_connect--on_disconnect-trigger
on_connect:
- delay: 5s
- lvgl.widget.hide: boot_screen
# https://esphome.io/components/captive_portal/
captive_portal:
# https://esphome.io/components/substitutions/
substitutions:
heater: climate_heater
indoor_temp: sensor_indoor_temperature
indoor_humid: sensor_indoor_humidity
amp_switch: switch.appliance_switch
light_switch: light.room_light
# https://esphome.io/components/time/
time:
# https://esphome.io/components/time/homeassistant/
- platform: homeassistant
id: esptime
# https://esphome.io/components/time/#on_time_sync-trigger
on_time_sync:
- script.execute: time_update
# https://esphome.io/components/time/#on_time-trigger
on_time:
- minutes: '*'
seconds: 0
then:
- script.execute: time_update
- hours: 2,3,4,5
minutes: 5
seconds: 0
then:
- switch.turn_on: switch_antiburn
- hours: 2,3,4,5
minutes: 35
seconds: 0
then:
- switch.turn_off: switch_antiburn
# https://esphome.io/components/script/
script:
- id: time_update
then:
- lvgl.label.update:
# https://esphome.io/components/time/#use-in-lambdas
id: lbl_time
text:
# https://esphome.io/components/time/#strftime
time_format: "%I:%M %p"
time: !lambda return id(esptime).now();
- lvgl.label.update:
id: lbl_date
text:
time_format: "%a, %e %b"
time: !lambda return id(esptime).now();
- id: update_weather
then:
- lvgl.label.update:
id: lbl_weather_forecast_condition_icon
text: !lambda return weather_icon_map[id(forecast_desc).state.c_str()].c_str();
- lvgl.label.update:
id: lbl_weather_forecast_des
text: !lambda return weather_desc_map[id(forecast_desc).state.c_str()].c_str();
- id: update_outside_temp
then:
- lvgl.label.update:
id: lbl_temp
text:
format: "%.1f%s"
args: [id(outside_temperature).state, id(outside_temperature_unit).state.c_str()]
- id: update_indoor_temp
then:
- lvgl.label.update:
id: lbl_indoor_temp
text:
format: "%.1f%s"
args: [id(indoor_temperature).state, id(outside_temperature_unit).state.c_str()]
- id: update_indoor_setting
then:
- lvgl.label.update:
id: lbl_current_temp_setting
text:
format: "%.1f%s"
args: [id(indoor_temp_setting).state, id(outside_temperature_unit).state.c_str()]
- lvgl.label.update:
id: icon_heater
text: !lambda if(id(indoor_hvac_action).state == "heating") {return "\U000F0238";} else {return "\U000F1807";}
text_color: !lambda if(id(indoor_hvac_action).state == "heating") {return lv_color_hex(0xFF4500);} else {return lv_color_hex(0x778899);}
- lvgl.label.update:
id: lbl_current_temp_preset
text: !lambda return id(indoor_temp_preset).state;
text_color: !lambda if(id(indoor_temp_preset).state == "frost") {return lv_color_hex(0x4682B4);} else if(id(indoor_temp_preset).state == "boost") {return lv_color_hex(0xFF4500);} else if(id(indoor_temp_preset).state == "eco") {return lv_color_hex(0x7CFC00);} else {return lv_color_hex(0x778899);}
- id: update_amp_switch
then:
- lvgl.label.update:
id: icon_amp_switch
text: !lambda if(id(amp_switch).state) {return "\U000F0030";} else {return "\U000F11B5";}
text_color: !lambda if(id(amp_switch).state) {return lv_color_hex(0xFF4500);} else {return lv_color_hex(0x778899);}
- id: update_light_switch
then:
- lvgl.label.update:
id: icon_light_switch
text: !lambda if(id(light_switch).state) {return "\U000F0335";} else {return "\U000F0336";}
text_color: !lambda if(id(light_switch).state) {return lv_color_hex(0xFF4500);} else {return lv_color_hex(0x778899);}
- id: set_indoor_preset
parameters:
preset: string
then:
- homeassistant.action:
action: climate.set_preset_mode
data:
entity_id: climate.${heater}
data_template:
preset_mode: !lambda return preset;
# https://esphome.io/components/number/template/
number:
- platform: template
name: LVGL Screen timeout
optimistic: true
id: display_timeout
unit_of_measurement: "s"
initial_value: 45
restore_value: true
min_value: 10
max_value: 180
step: 5
mode: box
# https://esphome.io/components/sensor/
sensor:
# https://esphome.io/components/sensor/homeassistant/
- platform: homeassistant
id: indoor_temperature
entity_id: sensor.${indoor_temp}
internal: true
on_value:
then:
script.execute: update_indoor_temp
- platform: homeassistant
id: indoor_humidity
entity_id: sensor.${indoor_humid}
internal: true
on_value:
then:
- lvgl.label.update:
id: lbl_indoor_humidity
text:
format: "%.0f%%"
args: [x]
- platform: homeassistant
id: outside_temperature
attribute: temperature
entity_id: weather.forecast_home
internal: true
on_value:
then:
script.execute: update_outside_temp
# Versatile Thermostat integration
# https://github.com/jmcollin78/versatile_thermostat
- platform: homeassistant
id: indoor_temp_setting
attribute: temperature
entity_id: climate.${heater}
internal: true
on_value:
then:
script.execute: update_indoor_setting
# https://esphome.io/components/text_sensor/
text_sensor:
# https://esphome.io/components/text_sensor/homeassistant/
- platform: homeassistant
id: outside_temperature_unit
entity_id: weather.forecast_home
attribute: temperature_unit
internal: true
on_value:
then:
- script.execute: update_outside_temp
- script.execute: update_indoor_temp
- script.execute: update_indoor_setting
- platform: homeassistant
id: forecast_desc
entity_id: weather.forecast_home
internal: true
on_value:
then:
script.execute: update_weather
- platform: homeassistant
id: indoor_hvac_action
attribute: hvac_action
entity_id: climate.${heater}
internal: true
on_value:
then:
script.execute: update_indoor_setting
- platform: homeassistant
id: indoor_temp_preset
attribute: preset_mode
entity_id: climate.${heater}
internal: true
on_value:
then:
script.execute: update_indoor_setting
# https://esphome.io/components/output/
output:
# https://esphome.io/components/output/ledc/
- platform: ledc
pin: GPIO04
id: rgb_led_red
frequency: 1000Hz
inverted: True
- platform: ledc
pin: GPIO16
id: rgb_led_green
inverted: True
- platform: ledc
pin: GPIO17
id: rgb_led_blue
inverted: True
- platform: ledc
pin: GPIO27
id: backlight_pwm
# https://esphome.io/components/switch/
switch:
# https://esphome.io/components/switch/homeassistant/
- platform: homeassistant
id: amp_switch
entity_id: ${amp_switch}
internal: True
on_state:
then:
script.execute: update_amp_switch
- platform: homeassistant
id: light_switch
entity_id: ${light_switch}
internal: True
on_state:
then:
script.execute: update_light_switch
# https://esphome.io/components/switch/template/
# https://esphome.io/cookbook/lvgl/#prevent-burn-in-of-lcd
- platform: template
name: Antiburn
id: switch_antiburn
icon: mdi:television-shimmer
optimistic: true
entity_category: "config"
turn_on_action:
- logger.log: "Starting Antiburn"
- if:
condition: lvgl.is_paused
then:
- lvgl.resume:
- lvgl.widget.redraw:
- lvgl.pause:
show_snow: true
turn_off_action:
- logger.log: "Stopping Antiburn"
- if:
condition: lvgl.is_paused
then:
- lvgl.resume:
- lvgl.widget.redraw:
# https://esphome.io/components/light/
light:
# https://esphome.io/components/light/monochromatic/
- platform: monochromatic
output: backlight_pwm
name: "Display Backlight"
id: backlight
restore_mode: ALWAYS_ON
# https://esphome.io/components/light/rgb/
- platform: rgb
id: internal_rgb
name: "RGB"
red: rgb_led_red
green: rgb_led_green
blue: rgb_led_blue
restore_mode: ALWAYS_OFF
# https://esphome.io/components/spi/
spi:
- id: spi_card
clk_pin: GPIO18
mosi_pin: GPIO23
miso_pin: GPIO19
- id: spi_display
clk_pin: GPIO14
mosi_pin: GPIO13
miso_pin: GPIO12
# https://esphome.io/components/display/
display:
# https://esphome.io/components/display/mipi_spi/
- platform: mipi_spi
model: ST7789V
spi_id: spi_display
cs_pin: GPIO15
dc_pin: GPIO02
#color_depth: 8
data_rate: 40MHz
rotation: 90
auto_clear_enabled: false
update_interval: never
# https://esphome.io/components/i2c/
i2c:
id: i2c_bus
sda: GPIO33
scl: GPIO32
# https://esphome.io/components/touchscreen/
touchscreen:
# https://esphome.io/components/touchscreen/cst816/
platform: cst816
id: my_touchscreen
# do not setup interrupt pin!!!
#interrupt_pin:
reset_pin: GPIO25
transform:
swap_xy: True
mirror_y: True
mirror_x: False
# on_touch:
# - lambda: |-
# ESP_LOGI("cal", "x=%d, y=%d, x_raw=%d, y_raw=%0d",
# touch.x,
# touch.y,
# touch.x_raw,
# touch.y_raw
# );
# https://esphome.io/cookbook/lvgl/#turn-off-screen-when-idle
on_release:
then:
- if:
condition: lvgl.is_paused
then:
- logger.log: "LVGL resuming"
- lvgl.resume:
- lvgl.widget.redraw:
- light.turn_on: backlight
# https://esphome.io/components/display/#color
color:
- id: ha_blue
hex: 51C0F2
- id: main_bg
hex: 0A0A0A
- id: widget_bg
hex: 1B1B1B
- id: text_main
hex: F0F0F0
- id: button_bg
hex: 4F4F4F
- id: widget_press_bg
hex: D3D3D3
# https://esphome.io/components/image/
image:
- id: boot_logo
type: RGB565
file: https://esphome.io/favicon.ico
resize: 200x200
transparency: alpha_channel
byte_order: big_endian
# https://esphome.io/components/font/
font:
- id: title_med
file:
type: gfonts
family: Roboto
size: 16
bpp: 4
- id: value_med
file:
type: gfonts
family: Montserrat
size: 16
bpp: 4
- id: value_small
file:
type: gfonts
family: Montserrat
size: 10
bpp: 4
- id: value_large
file:
type: gfonts
family: Montserrat
weight: bold
size: 28
bpp: 4
- id: mdi_small
file: assets/materialdesignicons-webfont.ttf
size: 24
bpp: 4
glyphs: [
"\U000F0F55", # mdi-home-thermometer-outline
"\U000F0335", # mdi-lightbulb
"\U000F0336", # mdi-lightbulb-outline
"\U000F0026", # mdi-alert
"\U000F12A4", # mdi-battery-charging-low
"\U000F12A5", # mdi-battery-charging-medium
"\U000F12A6", # mdi-battery-charging-high
"\U000F12A1", # mdi-battery-low
"\U000F12A2", # mdi-battery-medium
"\U000F12A3", # mdi-battery-high
"\U000F0091", # mdi-battery-unknown
"\U000F0E1B", # mdi-car-back
"\U000F1904", # mid-home-lightning-bolt-outline
]
- id: mdi_med
file: assets/materialdesignicons-webfont.ttf
size: 64
glyphs: [
"\U000F0594", # clear-night
"\U000F0590", # cloudy
"\U000F0F2F", # exceptional
"\U000F0591", # fog
"\U000F0592", # hail
"\U000F0593", # lightning
"\U000F067E", # lightning-rainy
"\U000F0595", # partlycloudy
"\U000F0596", # pouring
"\U000F0597", # rainy
"\U000F0598", # snowy
"\U000F067F", # snowy-rainy
"\U000F0599", # sunny
"\U000F059D", # windy
"\U000F059E", # windy-variant
"\U000F14E4", # sunny-off
"\U000F0F55", # mdi-thermometer
"\U000F0335", # mdi-lightbulb
"\U000F0336", # mdi-lightbulb-outline
"\U000F0026", # mdi-alert
"\U000F0238", # mdi-fire
"\U000F1807", # mdi-fire-circle
"\U000F0030", # mdi-amplifier
"\U000F11B5", # mdi-amplifier-off
]
- id: mdi_large
file: assets/materialdesignicons-webfont.ttf
size: 96
bpp: 4
glyphs: [
"\U000F0594", # clear-night
"\U000F0590", # cloudy
"\U000F0F2F", # exceptional
"\U000F0591", # fog
"\U000F0592", # hail
"\U000F0593", # lightning
"\U000F067E", # lightning-rainy
"\U000F0595", # partlycloudy
"\U000F0596", # pouring
"\U000F0597", # rainy
"\U000F0598", # snowy
"\U000F067F", # snowy-rainy
"\U000F0599", # sunny
"\U000F059D", # windy
"\U000F059E", # windy-variant
"\U000F14E4", # sunny-off
]
# https://esphome.io/components/lvgl/
lvgl:
buffer_size: 25%
theme:
obj:
overflow_visible: false
pad_all: 0
border_color: white
border_width: 0
bg_opa: 0
radius: 12
scrollbar_mode: "OFF"
bg_color: main_bg
label:
text_align: center
text_color: text_main
align: center
style_definitions:
- id: inner_panel
border_width: 0
grid_cell_x_align: STRETCH
grid_cell_y_align: STRETCH
on_idle:
timeout: !lambda "return (id(display_timeout).state * 1000);"
then:
- logger.log: "LVGL is idle"
- light.turn_off: backlight
- lvgl.pause:
# https://esphome.io/cookbook/lvgl/#esphome-boot-screen
top_layer:
widgets:
- obj:
id: boot_screen
x: 0
y: 0
width: 100%
height: 100%
bg_color: 0xffffff
bg_opa: COVER
radius: 0
pad_all: 0
border_width: 0
widgets:
- image:
align: CENTER
src: boot_logo
y: -40
- spinner:
align: CENTER
y: 95
height: 50
width: 50
spin_time: 1s
arc_length: 60deg
arc_width: 8
indicator:
arc_color: 0x18bcf2
arc_width: 8
- label:
align: BOTTOM_MID
id: lbl_boot
pad_bottom: 6
text: "starting ..."
pages:
- id: dashboard_page
bg_color: widget_bg
widgets:
- obj:
x: 0
y: 0
width: 320
height: 240
radius: 8
pad_all: 0
layout:
type: grid
grid_row_align: start
grid_rows: [FR(1), FR(1), FR(1), FR(1), FR(1), FR(1)]
grid_columns: [FR(1), FR(1), FR(1), FR(1), FR(1), FR(1), FR(1), FR(1)]
pad_row: 0
pad_column: 0
widgets:
- obj:
styles: inner_panel
grid_cell_row_pos: 0
grid_cell_column_pos: 0
grid_cell_column_span: 4
widgets:
- label:
id: lbl_time
text: "11:27 AM"
text_font: value_large
text_color: text_main
- obj:
styles: inner_panel
grid_cell_row_pos: 0
grid_cell_column_pos: 4
grid_cell_column_span: 4
widgets:
- label:
id: lbl_date
text: "Mon, 20 Oct"
text_font: value_med
text_color: text_main
- obj:
styles: inner_panel
grid_cell_row_pos: 1
grid_cell_column_pos: 0
grid_cell_row_span: 3
grid_cell_column_span: 3
widgets:
- label:
id: lbl_weather_forecast_condition_icon
text: "\U000F0591"
text_font: mdi_large
text_color: ha_blue
- obj:
styles: inner_panel
grid_cell_row_pos: 1
grid_cell_column_pos: 3
grid_cell_column_span: 3
widgets:
- label:
id: lbl_temp
text: "14.3\u00B0C"
text_font: value_large
text_color: text_main
- obj:
styles: inner_panel
grid_cell_row_pos: 2
grid_cell_column_pos: 3
grid_cell_column_span: 3
widgets:
- label:
id: lbl_weather_forecast_des
text: "Partially Cloudy"
text_font: value_small
text_color: text_main
- obj:
styles: inner_panel
grid_cell_row_pos: 1
grid_cell_column_pos: 6
grid_cell_row_span: 2
grid_cell_column_span: 2
widgets:
- label:
id: lbl_indoor_temp
align: TOP_RIGHT
pad_all: 0
pad_top: 12
pad_bottom: 0
pad_left: 0
pad_right: 8
text: "18.7\u00B0C"
text_font: value_med
text_color: text_main
- label:
id: lbl_indoor_humidity
align_to:
id: lbl_indoor_temp
align: OUT_BOTTOM_RIGHT
pad_all: 0
pad_top: 8
pad_bottom: 0
pad_left: 0
pad_right: 8
text: "48%"
text_font: value_med
text_color: text_main
- label:
id: icon_indoor
align_to:
id: lbl_indoor_humidity
align: OUT_LEFT_MID
pad_all: 0
pad_top: 8
pad_bottom: 0
pad_left: 0
pad_right: 6
text: "\U000F0F55"
text_font: mdi_small
text_color: text_main
- obj:
styles: inner_panel
id: obj_amp_switch
grid_cell_row_pos: 4
grid_cell_column_pos: 0
grid_cell_row_span: 2
grid_cell_column_span: 2
bg_color: button_bg
border_width: 1
border_color: widget_bg
bg_opa: COVER
radius: 12
widgets:
- label:
id: icon_amp_switch
text: "\U000F11B5"
text_font: mdi_med
text_color: grey
- obj:
width: 100%
height: 100%
bg_opa: 0
on_click:
then:
- switch.toggle: amp_switch
on_press:
then:
- lvgl.widget.update:
id: obj_amp_switch
bg_color: widget_press_bg
on_release:
then:
- lvgl.widget.update:
id: obj_amp_switch
bg_color: button_bg
- obj:
styles: inner_panel
id: obj_light_switch
grid_cell_row_pos: 4
grid_cell_column_pos: 2
grid_cell_row_span: 2
grid_cell_column_span: 2
bg_color: button_bg
border_width: 1
border_color: widget_bg
radius: 12
bg_opa: COVER
widgets:
- label:
id: icon_light_switch
text: "\U000F0336"
text_font: mdi_med
text_color: grey
- obj:
width: 100%
height: 100%
bg_opa: 0
on_click:
then:
- switch.toggle: light_switch
on_press:
then:
- lvgl.widget.update:
id: obj_light_switch
bg_color: widget_press_bg
on_release:
then:
- lvgl.widget.update:
id: obj_light_switch
bg_color: button_bg
- obj:
styles: inner_panel
grid_cell_row_pos: 4
grid_cell_column_pos: 4
grid_cell_row_span: 2
grid_cell_column_span: 2
bg_color: button_bg
border_width: 1
border_color: widget_bg
radius: 12
bg_opa: COVER
widgets: []
- obj:
styles: inner_panel
id: obj_heater_switch
grid_cell_row_pos: 4
grid_cell_column_pos: 6
grid_cell_row_span: 2
grid_cell_column_span: 2
bg_color: button_bg
border_width: 1
border_color: widget_bg
bg_opa: COVER
radius: 12
widgets:
- label:
id: icon_heater
text: "\U000F1807"
text_font: mdi_med
text_color: red
- obj:
width: 100%
height: 100%
bg_opa: 0
on_click:
then:
script.execute:
id: set_indoor_preset
preset: !lambda if(id(indoor_temp_preset).state == "boost") {return "frost";} else {return "boost";}
on_press:
then:
- lvgl.widget.update:
id: obj_heater_switch
bg_color: widget_press_bg
on_release:
then:
- lvgl.widget.update:
id: obj_heater_switch
bg_color: button_bg
- obj:
styles: inner_panel
grid_cell_row_pos: 3
grid_cell_column_pos: 6
grid_cell_column_span: 2
bg_color: widget_bg
radius: 0
widgets:
- label:
id: lbl_current_temp_setting
align: TOP_RIGHT
pad_all: 0
pad_top: 2
pad_bottom: 0
pad_left: 0
pad_right: 2
text: "14.0\u00B0C"
text_font: value_med
text_color: green
- label:
id: lbl_current_temp_preset
align_to:
id: lbl_current_temp_setting
align: OUT_BOTTOM_RIGHT
pad_all: 0
pad_top: 2
pad_bottom: 0
pad_left: 0
pad_right: 2
text: "Frost"
text_font: value_small
text_color: green
- obj:
styles: inner_panel
grid_cell_row_pos: 3
grid_cell_column_pos: 3
grid_cell_column_span: 3
widgets: []Configuration Breakdown
Substitutions
The configuration uses substitutions to make it easy to adapt to your Home Assistant setup:
substitutions:
  heater: climate_heater               # Your climate entity ID (without climate. prefix)
  indoor_temp: sensor_indoor_temperature    # Indoor temperature sensor (without sensor. prefix)
  indoor_humid: sensor_indoor_humidity      # Indoor humidity sensor (without sensor. prefix)
  amp_switch: switch.appliance_switch       # Full entity ID for switch control
  light_switch: light.room_light            # Full entity ID for light control
Note: The amp_switch and light_switch require the full entity ID including the domain prefix
(e.g., switch. or light.) because they can be various entity types (switch, light, etc.) in Home Assistant.
Weather Integration
This project assumes you have a working weather integration in Home Assistant, typically configured as
weather.forecast_home. The outside temperature is obtained from the temperature attribute of this entity.
Climate Control Integration
This configuration was designed to work with the Versatile Thermostat custom integration for Home Assistant. Versatile Thermostat is a powerful climate integration that provides advanced thermostat features including multiple preset modes (frost, eco, boost), various heating strategies, and comprehensive automation support.
If you’re using a different climate integration, you may need to adjust:
- The preset mode names in the
set_indoor_presetscript - The color coding logic in
update_indoor_settingscript - The available preset modes accessible via the heater button
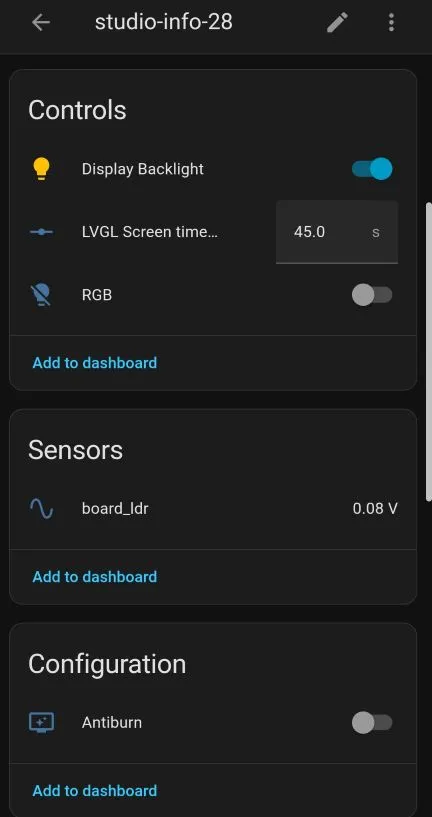
Display Features
Auto-Sleep and Wake
- The display automatically dims and pauses after a configurable timeout (default 45 seconds)
- Tap anywhere on the screen to wake it up
- Timeout can be adjusted via the “LVGL Screen timeout” number entity (10-180 seconds)
- From LVGL Cookbook
Anti-Burn-In Protection
- Automatically activates during early morning hours (2-5 AM)
- Runs for 30 minutes each hour
- Shows a “snow” effect to prevent pixel burn-in
- Can be manually controlled via the “Antiburn” switch entity
- From LVGL Cookbook
Boot Screen
- Shows ESPHome logo with spinner during startup
- Displays connection status
- Automatically hides when WiFi connects
-
- From LVGL Cookbook
UI Layout
The interface uses an 8-column × 6-row grid layout:
+----+----+----+----+----+----+----+----+
|        Time       |      Date         |  Row 0
+----+----+----+----+----+----+----+----+
|              |   Out Temp   | Indoor  |
+              +----+----+----+   Temp  |
|   Weather    | Weather Desc |   Humid |
+    Icon      +----+----+----+----+----+
|              |                        |
+----+----+----+----+----+----+----+----+
|   Amp   |  Light  |         | Heat Tmp|
+  Switch +  Switch +         + & Preset+
|         |         |         | Switch  |
+----+----+----+----+----+----+----+----+
  0    1    2    3    4    5    6    7  (Columns)
I split the screen first to make it simpler to design everything. There is some empty space so it can be improved or reorganized.
Scripts Explained
Time Update
Updates the time and date labels every minute and on time sync (when updated from Home Assistant).
Weather Updates
update_weather: Updates weather icon and description using the weather icon mapupdate_outside_temp: Updates outside temperature display
Indoor Climate Updates
update_indoor_temp: Updates indoor temperature readingupdate_indoor_setting: Updates thermostat target temperature, preset mode, and heating status icon
Switch Updates
update_amp_switch: Updates appliance switch icon and colorupdate_light_switch: Updates light switch icon and color
Preset Control
set_indoor_preset: Toggles between “boost” and “frost” modes when heater button is pressed
Installation Steps
Prepare Your Files
- Download the Material Design Icons - details in font component.
- Create the
weather_icon_map.hheader file (content here) - Create your
secrets.yamlfile with your WiFi credentials
Update Configuration
- Modify the
substitutionssection with your Home Assistant entity IDs - Update the API encryption key (generate a new one for security)
- Set OTA password and fallback hotspot password
If you wish you can add the rest of the “secrets” to the secrets file and use them like this for example:
api:
  encryption:
    key: !secret info_panel_28_api_key

ota:
  - platform: esphome
    password: !secret info_panel_28_ota_pwd

wifi:
  ssid: !secret wifi_ssid
  password: !secret wifi_password

  ap:
    ssid: "Panel-Info-28 Fallback Hotspot"
    password: !secret info_panel_28_fallback_pwd
And specify them all in the secrets.yaml:
wifi_ssid: "Your_WiFi_SSID"
wifi_password: "Your_WiFi_Password"

info_panel_28_api_key: "uKh1234567890abcdefghijklmnopqrstuvwxyz="
info_panel_28_ota_pwd: "strong-unique-password-device1"
info_panel_28_fallback_pwd: "unique-fallback-password-device1"


another_device_api_key: "aBc9876543210xyzqrstuvwxyzabcdefghijkl="
another_device_ota_pwd: "strong-unique-password-device2"
another_device_fallback_pwd: "unique-fallback-password-device2"
More info on how to manage secrets.
Flash ESPHome
Use ESPHome Device Builder, that’s simplest. After the first flash, you can use OTA updates.
Add to Home Assistant
The device should be automatically discovered in Home Assistant:
- Go to Settings → Devices & Services
- Look for the discovered ESPHome device
- Click Configure and enter your API encryption key
- ⚠️ By default new ESPHome device is not allowed to perform any Home Assistant Actions
- In order to:
- be able to turn on/off devices
- change heating presets
- You need to go to device settings in Home Assistant and select:
- Allow the device to perform Home Assistant actions
- In order to:
Verify Operation
Check that:
- Time and date display correctly
- Weather information updates
- Indoor temperature and humidity show values
- Switch buttons respond to touch
- Icons update when you control devices from Home Assistant
Troubleshooting
There is only a few things that might go wrong as long as you don’t change anything in the yaml file 😁. I’ll list out some possible issues. Hardware should be correctly configured if you’re using the same device.
Stuck at Boot Screen
If you’re stuck at boot screen that usually means the device cannot connect to WiFi.
Check your secrets.yaml that you have correct WiFi ssid and password. If this is correct, the best is to connect the device to your computer, open up ESPHome Web, connect to the device and open up logs. Reboot the device to see the logs from starting up and hopefully that will reveal any issues.
If no issues show up change logging level:
logger:
  level: DEBUG
Past the Boot Screen but Nothing is Updated
Most likely issue connecting to Home Assistant. Ensure you have added your device to Home Assistant. If you have and still nothing happens, check the logs.
If time/date is updated to the correct value - Home Assistant connection is established and the issue might be individual entities.
If time/date is updated, outside temperature and weather information should also get updated since nearly everyone has weather forecast integration.
Entity Status Not Updated
Check substitutions making sure that you have entered correct entity ids. For temperature/humidity sensor, lights and switches this should work just fine and a typo or incorrect entity id is most likely issue. Any climate entity should work for controling heating but see below.
Cannot Switch On/Off Lights/Appliance
Did you: Allow the device to perform Home Assistant actions?
Heating Control Not Working
If the correct preset and temperature setting is not updated - verify that climate entity ID is correct.
If the heater button doesn’t control thermostat see above.
While this should work with any climate control, check that preset modes (frost, boost, eco) are supported.
If they are not, you might need to change config slightly to support your settings. Maybe your setting
doesn’t have a boost preset - just replace boost in yaml with what your desired setting is. The same goes
for frost.
Random Reboots or Crashes
Problem: Device restarts unexpectedly
Solutions:
- Use adequate power supply (1A minimum)
- Reduce LVGL buffer size if running out of memory
- Lower logger level to WARN or ERROR
- Disable unnecessary components temporarily
Touchscreen Not Working
Are you using a resistive touchscreen? JC2432W328C is the device with capacitive touchscreen, but JC2432W328R has resistive touchscreen and it will have a different control chip and it needs to be calibrated differently.
Touchscreen Calibration Off
It would be unusual if touch coordinates don’t match screen position … for a capacitive touch screen, for resistive, all bets are off. This would mean that the chip is correct, but for whatever reason your device is working slightly differently than mine. Maybe you’re holding it up-side-down? 🙂
At any case things to try:
- Adjust
transformsettings (swap_xy, mirror_x, mirror_y) - Use the commented-out
on_touchlambda to log coordinates - Test each corner of screen to determine correct transform
- Verify display
rotationsetting matches physical orientation
Customization Ideas
Add More Buttons
Adding new button is relatively straight forward, however there are couple of things to consider.
UI Part
The bottom row has an empty button (columns 4-5, rows 4-5), so that is easy to add, just paste this to the end of the config yaml file (minding the indentation):
- obj:
  styles: inner_panel
  id: obj_my_switch
  grid_cell_row_pos: 4
  grid_cell_column_pos: 4
  grid_cell_row_span: 2
  grid_cell_column_span: 2
  bg_color: button_bg
  border_width: 1
  border_color: widget_bg
  bg_opa: COVER
  radius: 12
  widgets:
    - label:
        id: icon_my_switch
        #mdi-alert just as an example you can use light bulb or something
        text: "\U000F0026"
        text_font: mdi_med
        text_color: grey
    - obj:
        width: 100%
        height: 100%
        bg_opa: 0
        on_click:
          then:
            - switch.toggle: my_switch
        on_press:
          then:
            - lvgl.widget.update:
                id: obj_my_switch
                bg_color: widget_press_bg
        on_release:
          then:
            - lvgl.widget.update:
                id: obj_my_switch
                bg_color: button_bg
The above will create a button that when pressed will “flip” my_switch, you just need to setup your my_switch 😁.
Setting up My Switch
You need to configure your switch (can be a light or a switch, anything you can toggle, or it will require some more work):
#switch:
  - platform: homeassistant
    id: my_switch
    entity_id: your_my_switch_entity_id
    internal: True
    on_state:
      then:
        script.execute: update_my_switch
NOTE: I commented out #switch:, this is just to tell you where to put the rest of the code.
When the state of the switch changes our device gets notification from Home Assistant. This “triggers”
on_state event. When this happens we want to execute update_my_switch script so we can update UI with the
new state.
Update the Switch State on UI
#script:
  - id: update_my_switch
    then:
      - lvgl.label.update:
          id: icon_my_switch
          text_color: !lambda if(id(my_switch).state) {return lv_color_hex(0xFF4500);} else {return lv_color_hex(0x778899);}
Keep in mind that our device is not “flipping” the switch, it only tells Home Assistant to flip it. Once Home Assistant has done that it will notify our device back with the updated state and the code above will change color to red-ish if the state is ON, or grey-ish if the state is OFF.
There you have it, a new button!
Change Preset Mode Cycle
Modify the set_indoor_preset script to cycle through different modes:
- id: set_indoor_preset
  parameters:
    preset: string
  then:
    - homeassistant.action:
        action: climate.set_preset_mode
        data:
          entity_id: climate.${heater}
        data_template:
          preset_mode: !lambda |-
            // Cycle through: eco -> comfort -> boost -> frost -> eco
            if(id(indoor_temp_preset).state == "eco") return "comfort";
            else if(id(indoor_temp_preset).state == "comfort") return "boost";
            else if(id(indoor_temp_preset).state == "boost") return "frost";
            else return "eco";
Adjust Color Scheme
Modify the color definitions to match your preferences:
color:
  - id: ha_blue
    hex: 51C0F2        # Accent color for weather icons
  - id: main_bg
    hex: 0A0A0A        # Background color for the main screen (very dark)
  - id: widget_bg
    hex: 1B1B1B        # Background color for widgets (dark)
  - id: text_main
    hex: F0F0F0        # Default text color (light)
  - id: button_bg
    hex: 4F4F4F        # Background color for buttons (medium gray)
  - id: widget_press_bg
    hex: D3D3D3        # Highlight color for pressed buttons (light gray)
Add Additional Sensors
Display more information from Home Assistant:
sensor:
  - platform: homeassistant
    id: energy_usage
    entity_id: sensor.energy_home_grid_import_today
    on_value:
      then:
        - lvgl.label.update:
            id: lbl_energy
            text:
              format: "%.1f kW"
              args: [x]
Multiple Pages
Add more LVGL pages for different views:
lvgl:
  pages:
    - id: dashboard_page
      # ... existing dashboard ...

    - id: settings_page
      widgets:
        - label:
            text: "Settings"
            # ... settings widgets ...
Then add swipe gestures or buttons to navigate between pages.